Student Laptops
Students in 3rd through 12th grades at CCPS use Windows laptops for classroom instruction.
- How to connect your CCPS laptop to your home Wi-Fi
- Updating your CCPS laptop
- Microphone is not working - Troubleshooting your microphone
- Powering Off Your CCPS Laptop
- Mouse pad is not working - Enabling / disabling mouse pad
- Keyboard is typing numbers instead of letters - Disabling NUM lock on keyboard
- How to Check that Your Laptop is Charging Properly
- How to Check Your Internet Speed
- Accessing Wi-Fi in School Parking Lots
- Checking sound from headphones on your Laptop
How to connect your CCPS laptop to your home Wi-Fi
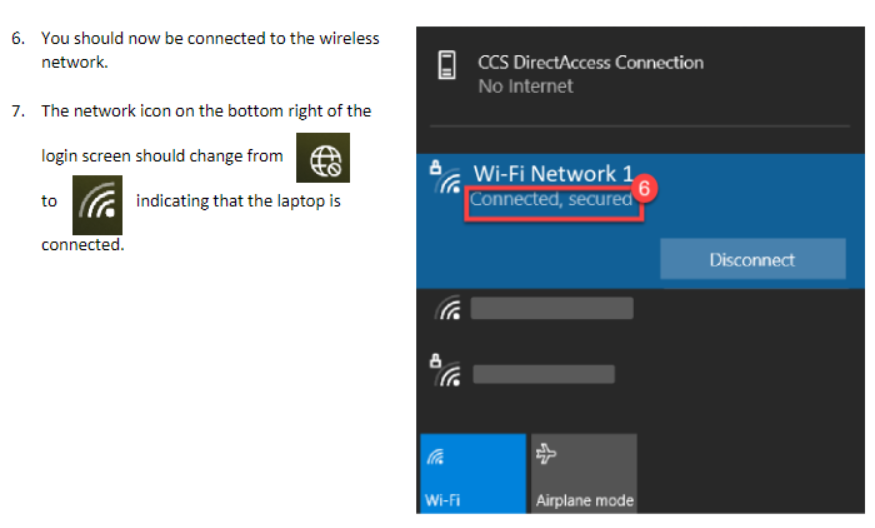
Follow the directions below to connect your student laptop to a wireless network. The step number corresponds to the number in the image. *Please note that this does not need to be done in a CCPS building as the laptop will connect automatically to the CCPS network.

Updating your CCPS laptop
One of the many maintenance processes one must undergo to keep a computer running properly is to allow and run updates as they are available. The updates from Microsoft or Windows are important for the health of your computer and for security needs. Unfortunately, updates can occur when you least expect and probably when you do not want it to update causing delays, like taking a test, or in a video call.
To properly manage the updates, here is a quick overview of what to do.
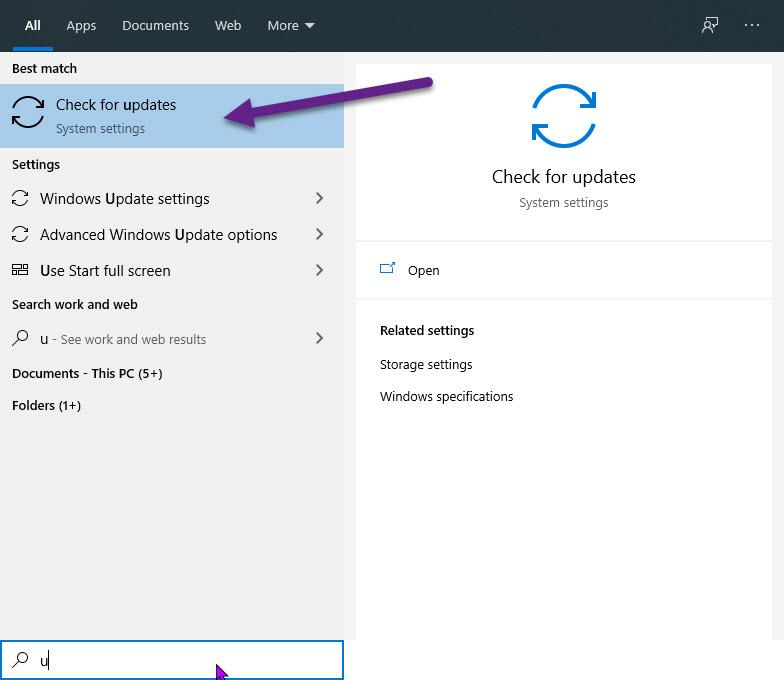
- Type "update" in your search bar

- As soon as you start typing a bigger window will appear. Click the ‘Check for Update’ area to open the next window.

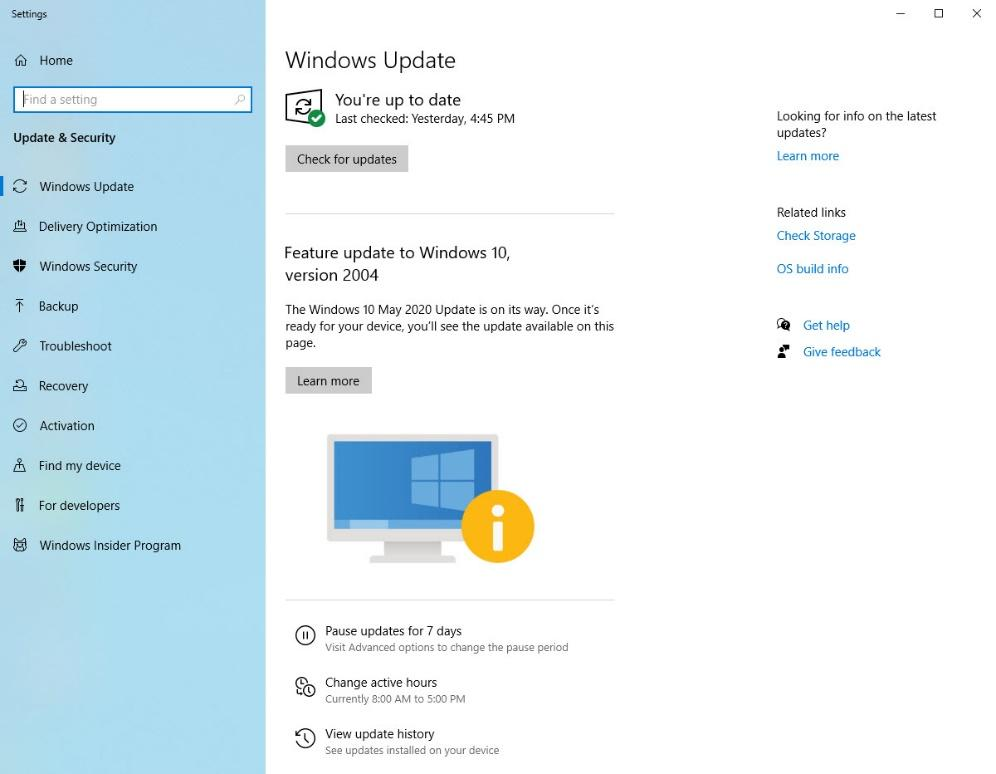
- The next 3 diagrams shows possible windows you may encounter. Follow the information provided to allow updates to progress or you may up-to-date on your updates which is the best case.

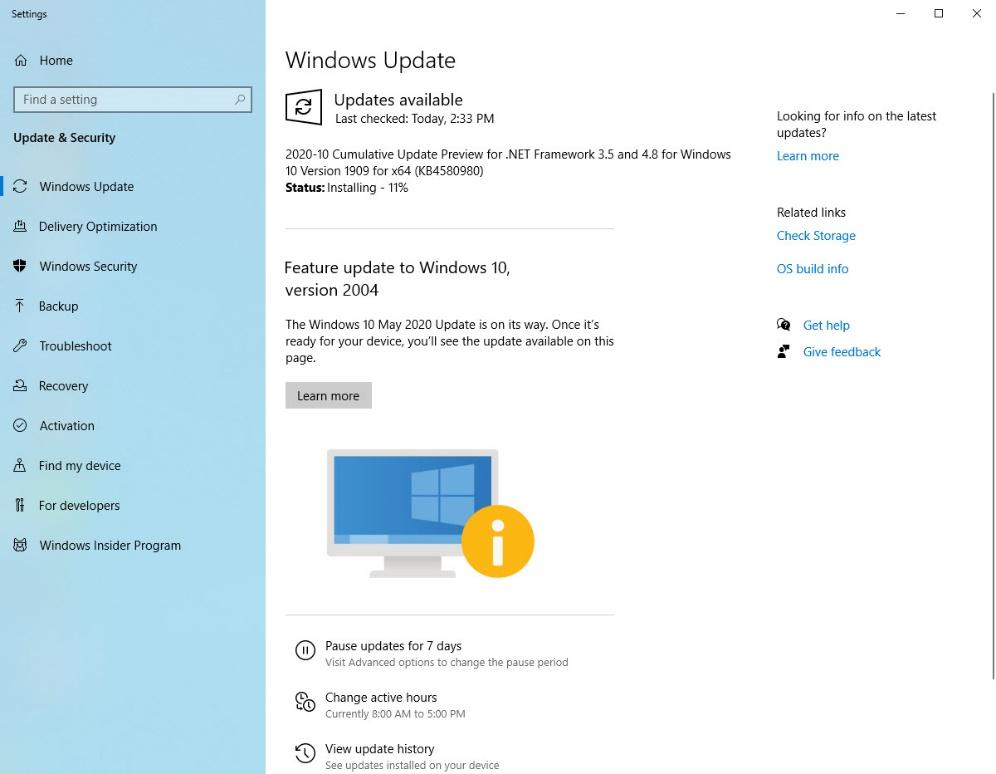
Updates already started downloading

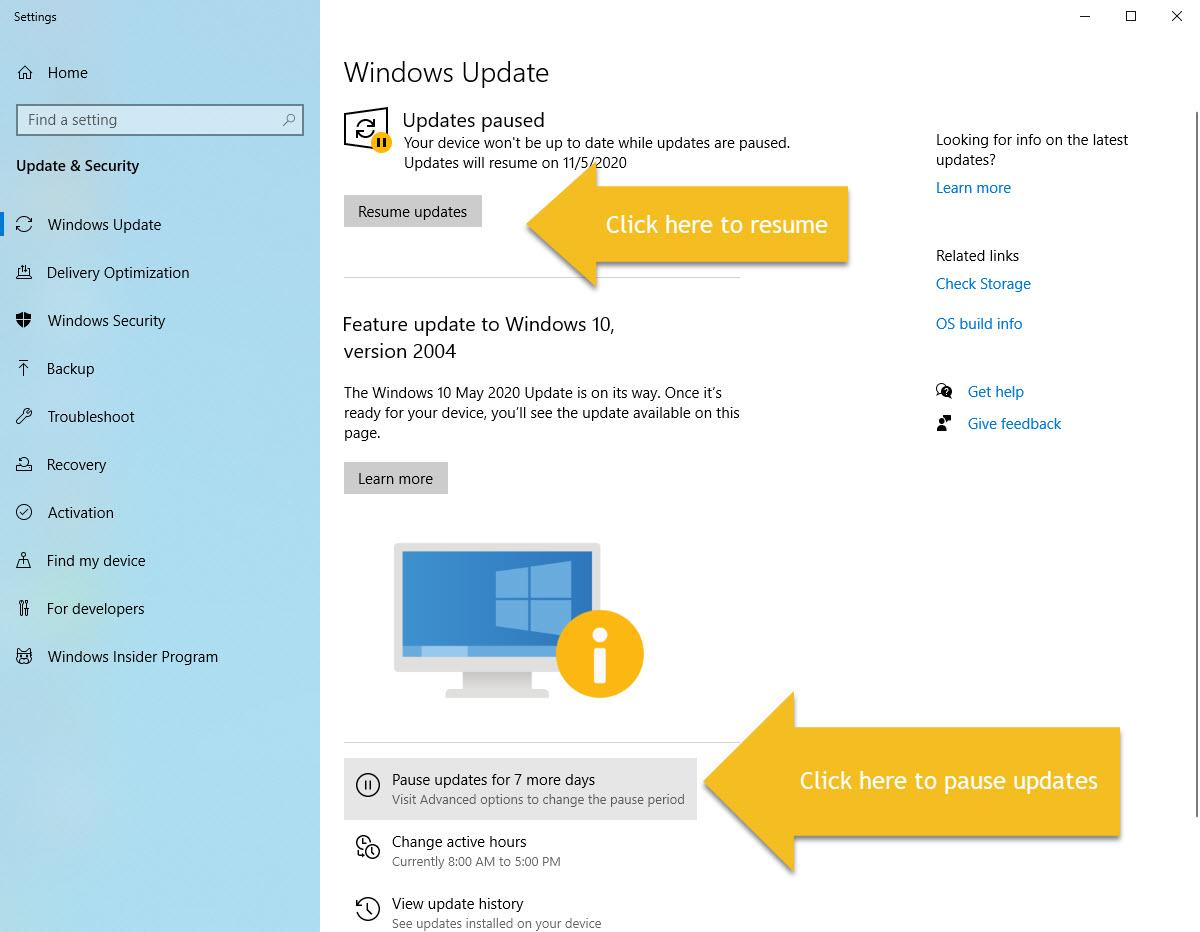
Updates are completely downloaded and need a restart

- OR you can pause the updates for 7 days, so you are not interrupted with your work/test. This is recommended if you are going to have some important work or test to be done within those 7 days.


Microphone is not working - Troubleshooting your microphone
If you are having microphone issues, follow the steps below to check the microphone settings.
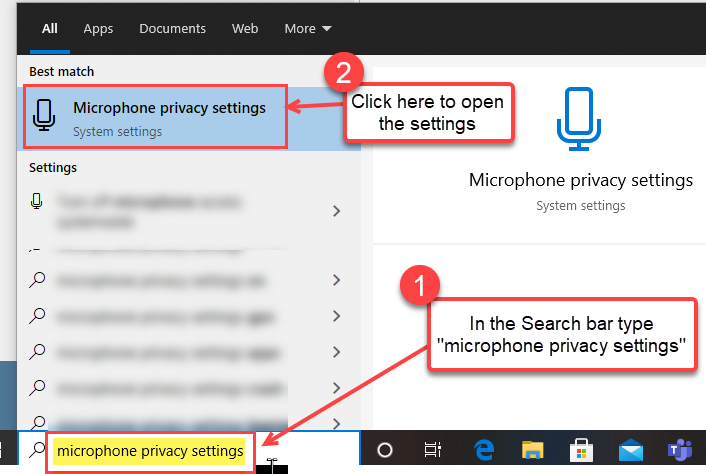
- In the white search bar located on the left side of the bottom task bar, type in the words, “microphone privacy settings.”
- In the results, click on the Microphone privacy settings option that appears at the top.

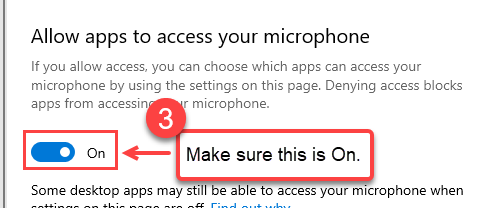
- Make sure the “On” button is enabled and blue.

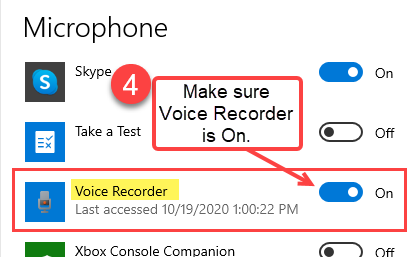
- Scroll down this page further until you see the Voice Recorder app. Make sure the “On” button is enabled and blue.

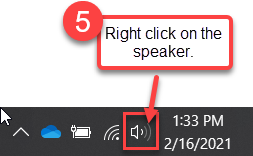
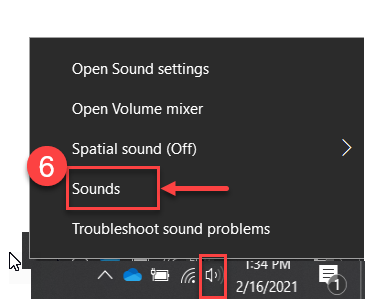
- In the bottom right corner of the task bar, right click on the sound icon.

- Click on Sounds.

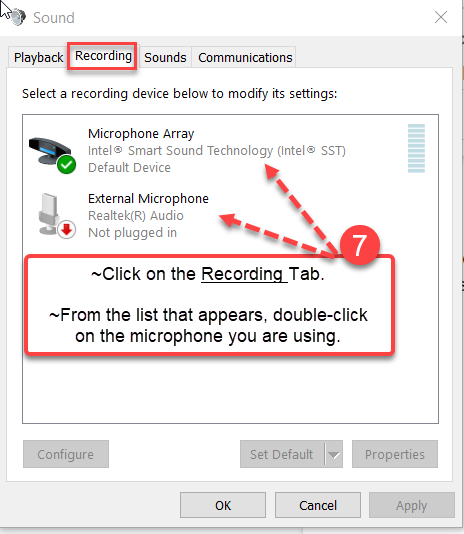
- Click on the Recording tab. From the list that appears, double-click on the microphone you are using.

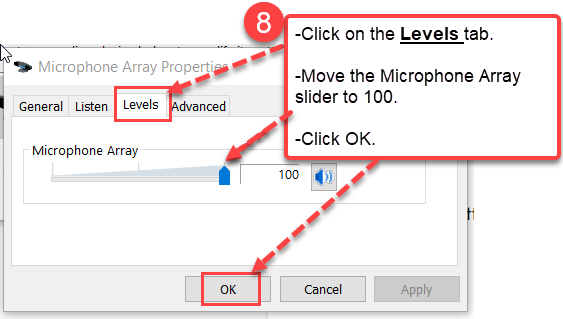
- In the box that opens, click on the Levels tab. Then move the Microphone Array slider all the way to 100 and click OK.

Powering Off Your CCPS Laptop
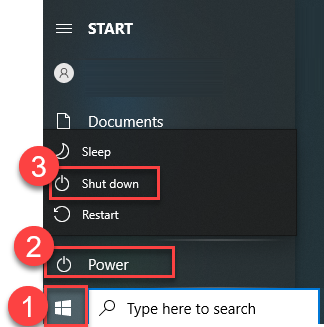
**DO NOT POWER OFF YOUR LAPTOP BY PRESSING & HOLDING THE POWER BUTTON**
Follow the directions below to properly power off your CCPS laptop.
- Click the Windows Start Menu icon in the bottom left corner of your taskbar.
- Click the Power icon.
- Click Shutdown.
- Wait for the screen to turn black before shutting the lid.
Mouse pad is not working - Enabling / disabling mouse pad
If your mouse pad is not working, it may have been disabled. If you see an amber light on the F2 key, this means the mouse pad is disabled.
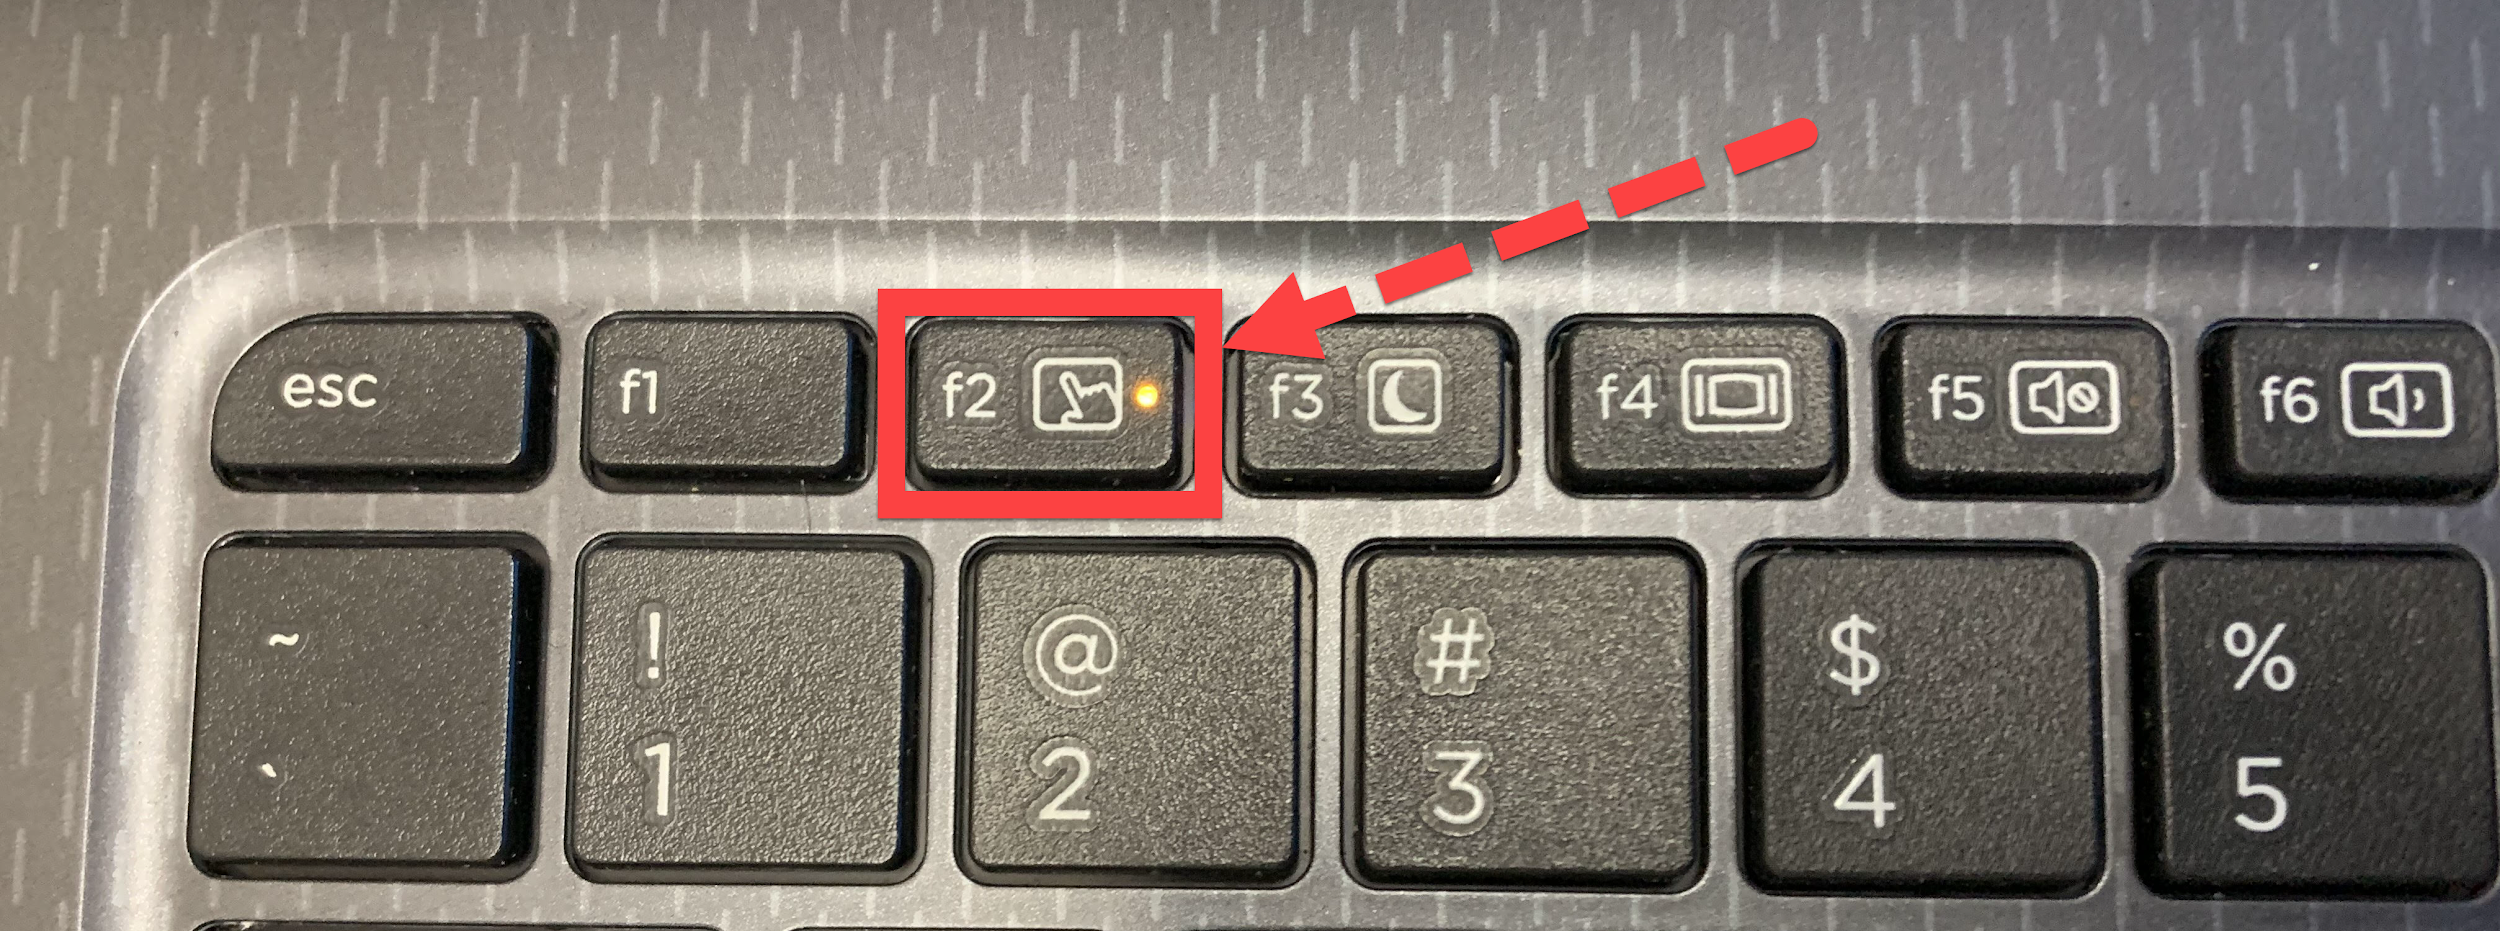
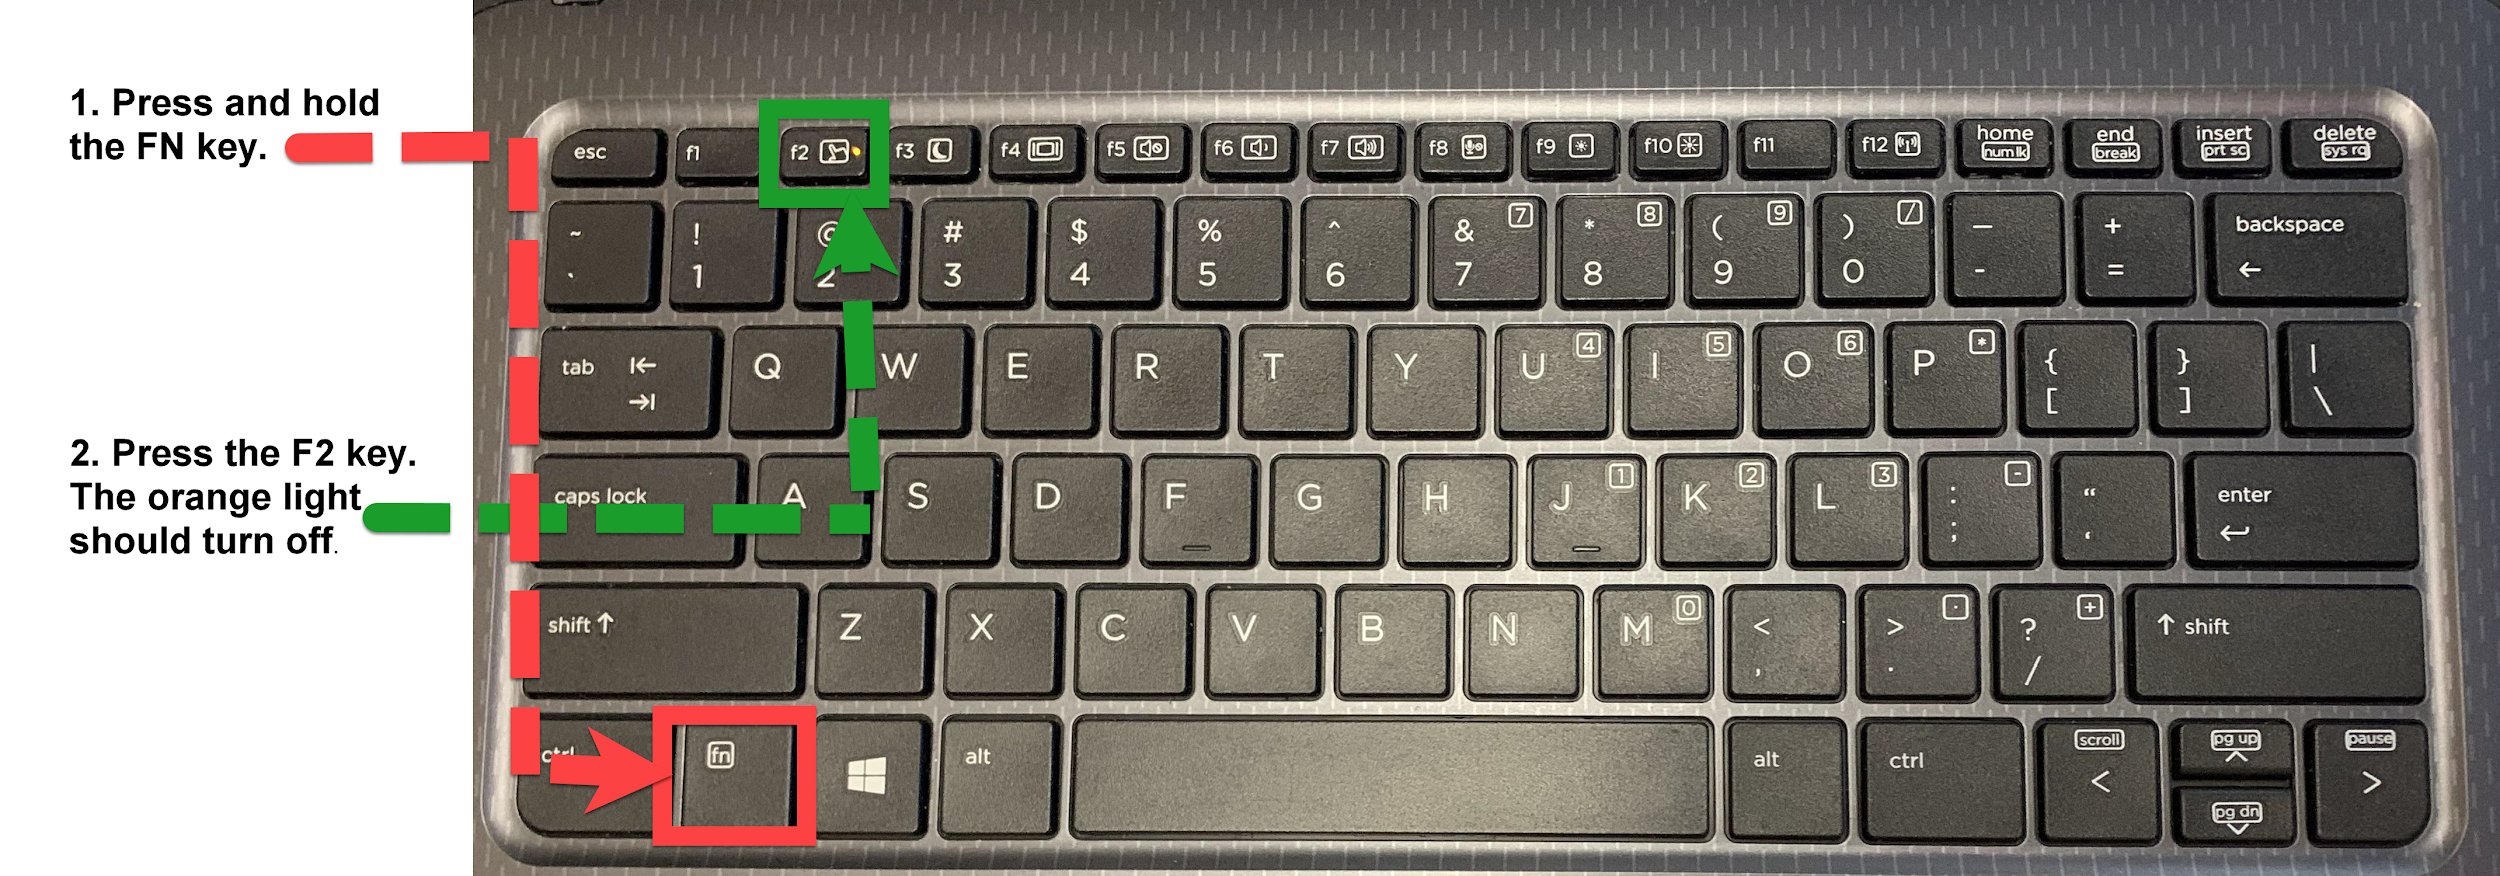
Follow the directions below to enable the keypad.
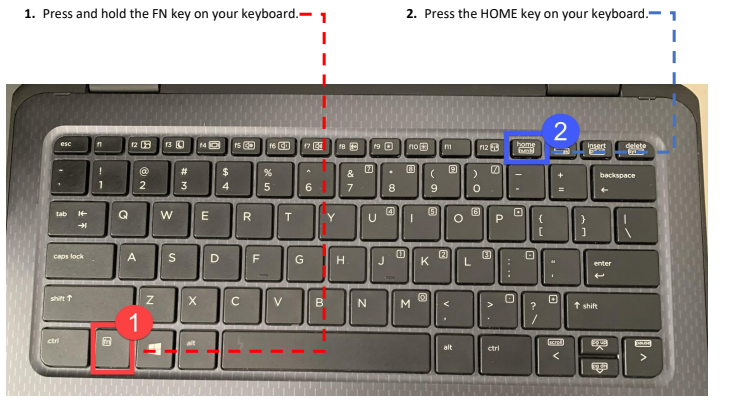
Keyboard is typing numbers instead of letters - Disabling NUM lock on keyboard
If your CCPS laptop shows numbers and/or symbols when you are pressing letters on the keyboard, then the most likely cause is that the NUM lock is enabled on your device. To disable the Num Lock, follow the steps below.
How to Check that Your Laptop is Charging Properly
**Please note that as a safety precaution and to prolong the life of the battery, your CCPS laptop battery will only charge to 80%. **
- Using your CCPS issued charge, connect your laptop to a power source.
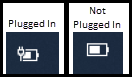
- The battery icon in the right-side of the taskbar will indicate that the laptop is plugged in and charging.

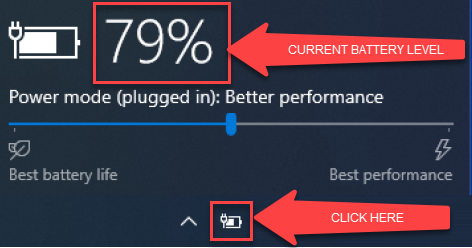
- Let your laptop charge and check that it charges to 79% - 80%. Click on the battery icon to display the current battery level.

- As your laptop is charging, also check that the battery icon continuously indicates that the laptop is plugged in (refer to step 2).
If you are able to complete steps 1-4 successfully, then your laptop is most likely charging correctly. If your battery does not reach 79% - 80% (step 3) or the battery icon flashes between being plugged in and not (step 4), then proceed to step 5. - Check that your CCPS issues laptop charger is securely connected to both the laptop and the wall outlet. Always push or pull in a straight line when inserting or removing the charger.
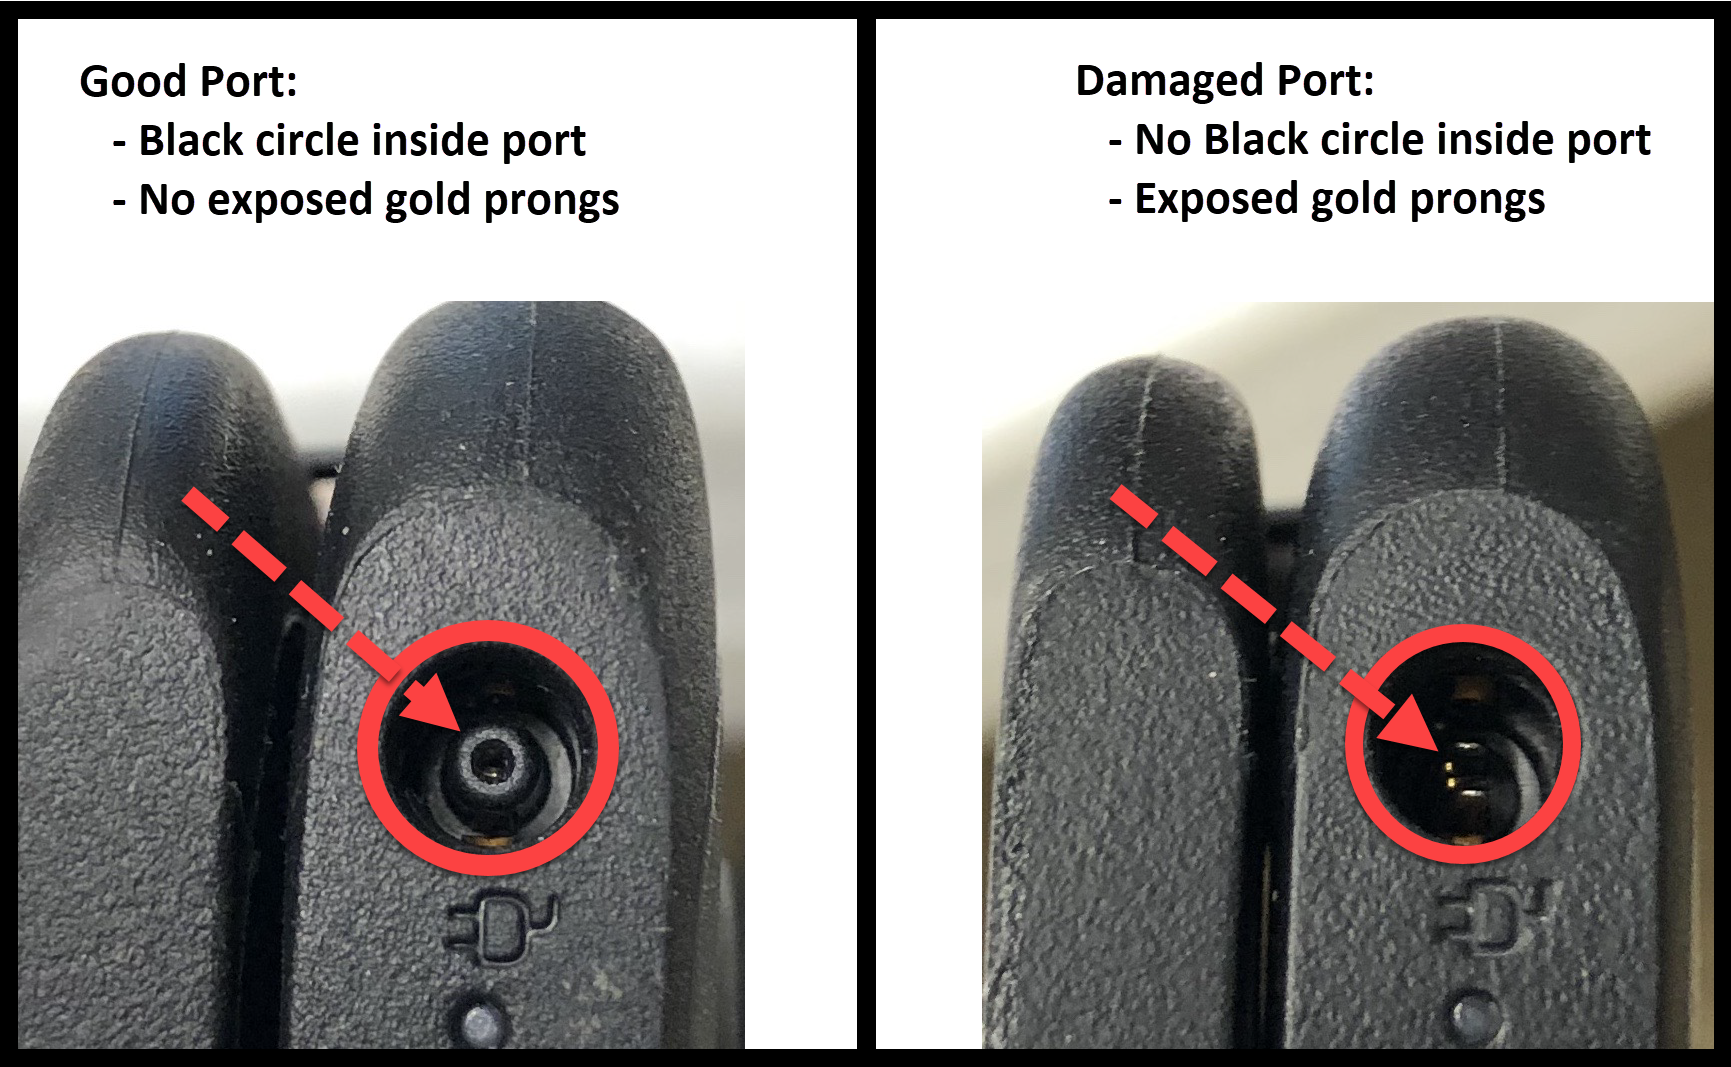
- Check the charging port on the laptop.
- If your charging port is damaged or there are other issues with the laptop charging and you have tried the steps listed above, please contact the Help Desk.

How to Check Your Internet Speed
- On your CCPS laptop, open Chrome.
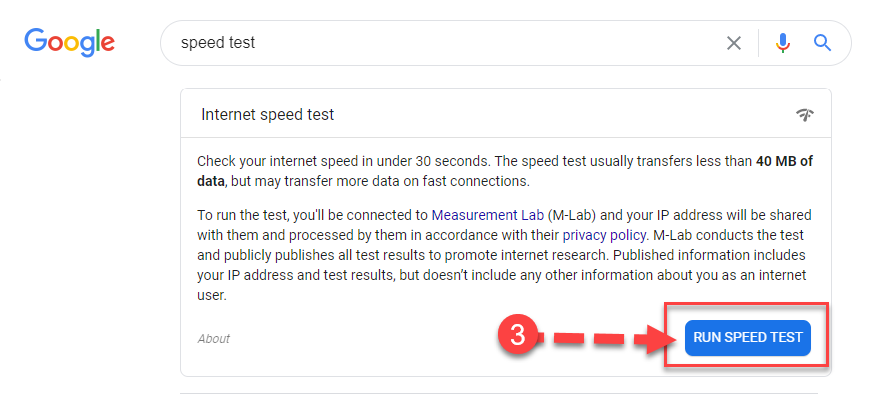
- Type “speed test” into the address bar and press the Enter key.

- Click RUN SPEED TEST.

- A new window will appear and the speed test should begin. Once complete you will see your download & upload speed.


Accessing Wi-Fi in School Parking Lots
Available Internet Access Locations:
- Front parking lot of Altavista Combined School
- Front parking lot of Brookville High School
- Front parking lot of Rustburg High School
- Front parking lot of William Campbell Combined School
- Front parking lot of Campbell County Technical Center
- Campbell County Public Libraries
Parents should contact their child’s school if other arrangements need to be made to facilitate instruction.
Checking sound from headphones on your Laptop
If there is no sound coming from your headphones or earphones, please try the following steps below. Please note that the number in the images correspond to the steps in the directions.
- First make sure that the headphones or earphones are properly inserted into the audio port on your laptop.
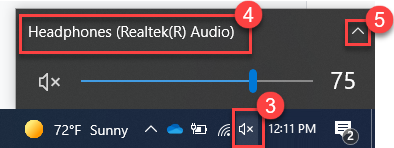
- Check the sound on your laptop and ensure that it is not muted by locating the sound icon on the right side of the task bar. If the icon looks like this then the audio is muted.
- Click the icon.
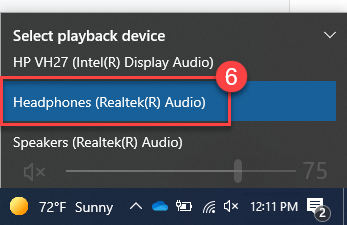
- Ensure that the headphones are selected as the playback device. If not, proceed to step 5. If so, then skip to step 7.
- Click the up arrow.

- Find and click the headphones to select them as the playback device.

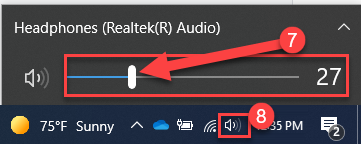
- Drag the slider to the right to increase the sound to a comfortable level.
- The sound symbol should now look like this.